
Invoker Spell Combinations: Complete 10-Spell Cheat Sheet & Mechanics
Review all 10 Invoker recipes, catch queue-order mistakes, and follow browser drills while checking patch-dependent cast and upgrade details in Dota 2.
Updated
On this page
- The 10 spells reference cheat sheet
- Understanding cast points, turn rate, and backswing
- 1. Separate the prepared spell from its cast
- 2. Test facing as a separate variable
- 3. Distinguish animation follow-through from lockout
- Aghanim's Scepter and Shard upgrades
- Aghanim's Scepter: Cataclysm
- Aghanim's Shard: Chaos Meteor and EMP augmentations
- Categorizing the 10 spells by tactical purpose
- 1. Crowd control and initiation
- 2. High-impact burst damage
- 3. Utility, buffs and resource denial
- Common recipe confusion pairs and diagnostic drills
- Confusion Pair 1: Tornado (QWW) versus Ice Wall (QQE)
- Confusion Pair 2: Chaos Meteor (WEE) versus Deafening Blast (QWE)
- Confusion Pair 3: Ghost Walk (QQW) versus Cold Snap (QQQ)
- Structured 4-stage practice routine on InvokerGame
- Stage 1: Tutorial Mode reflex benchmark
- Stage 2: Race Mode queue preservation
- Stage 3: Combat Mode slot discipline
- Stage 4: Daily Challenge leaderboard benchmarking
Invoker stands apart as the most versatile spellcaster in Dota 2, wielding an arsenal of 10 distinct abilities summoned by combining three elemental orbs: Quas (Q), Wex (W), and Exort (E) followed by Invoke (R).
Whether you are stepping into your first game or rebuilding an old habit, use this reference for the ten recipes and for the queue decisions the browser can actually check. Cast timing, damage, spell-immunity interactions and item upgrades belong to the current Dota client; the second half of the guide shows how to verify those separately rather than presenting one patch's numbers as permanent rules.
The 10 spells reference cheat sheet
In Dota 2, an invoked spell depends strictly on the count of each orb currently active in your 3-orb queue. The order in which you press them does not change the invoked spell, though it dictates which orb will be evicted next.
| Recipe | Ability | Elements to remember | Browser practice cue |
|---|---|---|---|
QQQ |  Cold Snap Cold Snap | Three Quas | A simple starting recipe; check the D/F slot after Invoke. |
WWW |  E.M.P. E.M.P. | Three Wex | Compare one-W and three-W transitions after Tornado. |
EEE |  Sun Strike Sun Strike | Three Exort | Keep the two trailing Exort orbs when moving to Meteor. |
QQW |  Ghost Walk Ghost Walk | Two Quas, one Wex | Do not confuse one added Exort with Ice Wall. |
QQE |  Ice Wall Ice Wall | Two Quas, one Exort | Check the actual queue before assuming one orb is enough. |
QWW |  Tornado Tornado | One Quas, two Wex | Prefer QWW when the next recipe is WWW. |
WWE |  Alacrity Alacrity | Two Wex, one Exort | Distinguish it from the two-Exort Meteor recipe. |
QEE |  Forge Spirit Forge Spirit | One Quas, two Exort | Notice that WEE + Q first becomes EEQ. |
WEE |  Chaos Meteor Chaos Meteor | One Wex, two Exort | Order the same elements for the next queue transition. |
QWE |  Deafening Blast Deafening Blast | One of each | Check whether Q or QW is needed from the current Meteor queue. |
Understanding cast points, turn rate, and backswing
A frequent mistake is treating three separate intervals—input recognition, turning and ability execution—as one universal number. They vary by spell, target and client settings, while the browser trainer measures only its own input sequence.
1. Separate the prepared spell from its cast
Invoking a recipe prepares an ability in D or F; casting that ability is another action. A fast recipe in this browser proves you selected and invoked the right spell. It does not establish the current client's cast point, projectile travel, target acquisition or network delay. In Hero Demo, put the spell in a known slot, issue one cast, and watch when its effect actually begins before comparing settings.
2. Test facing as a separate variable
For an action that requires facing a target, asking Invoker to cast behind him can add a turn before the spell starts. The amount is not a fixed shortcut you can add to every combo. The target can move, some actions behave differently, and the game's current turn and cast values may change.
Test A: face the target → cast → observe the first visible effect
Test B: face away from the same target → cast → observe turn and first effect
Keep level, target, range and settings the same before comparing.
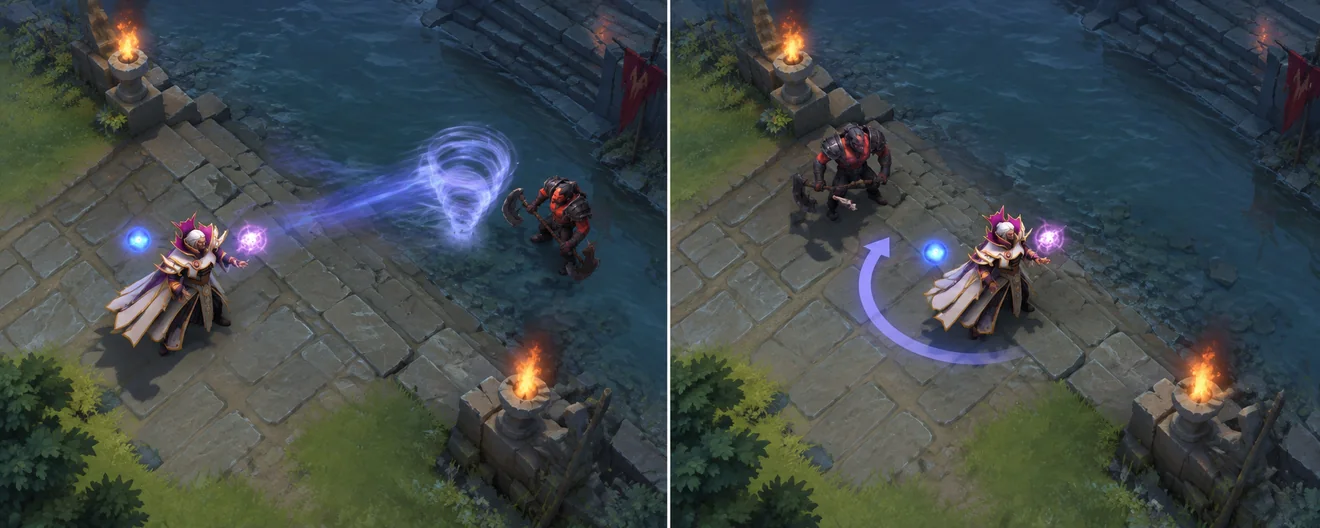
The image illustrates the direction change, not measured milliseconds. If the second test feels later, try moving into a useful facing direction before the next engagement. Record what you see in Hero Demo rather than attributing the whole difference to one assumed turn value.
3. Distinguish animation follow-through from lockout
An animation can continue after an ability takes effect, but a visible follow-through does not automatically mean the hero is unable to accept another command for its entire duration. In Hero Demo, cast once and issue a movement or next-spell command at different moments. Observe when the command is accepted and whether you accidentally interrupt a cast that has not yet completed. Use that repeatable observation to adjust the sequence; do not teach a universal 0.83-second lockout or assume an orb key cancels every animation.
Aghanim's Scepter and Shard upgrades
Item upgrades and facets can change how a spell is activated or what it does. Because these details move with patches, keep the recipe reference separate from the current client description.
Aghanim's Scepter: Cataclysm
When your current build offers Cataclysm, verify its activation in Hero Demo instead of assuming a particular double-tap or Alt shortcut:
- Read the upgrade text. Confirm which item or choice grants it, what its targets must satisfy, and whether its cooldown is shared with ordinary Sun Strike.
- Test the binding. Put Sun Strike in D, activate the configured self-cast action, and check the actual effect and cooldown. Repeat with Sun Strike in F. A second tap, a modifier and a self-cast binding are different input paths.
- Test target conditions. Compare a visible enemy with one outside vision. Then combine the effect with an allied disable and observe the real landing window. The browser cannot validate target visibility, damage or hit timing.
Aghanim's Shard: Chaos Meteor and EMP augmentations
If the current Shard modifies Chaos Meteor or EMP, read both ability descriptions before and after buying it. In Demo, first cast each spell without the upgrade, then buy it and repeat from the same position. Record the number and direction of projectiles, whether enemies move, and the displayed cooldown. Do not carry a remembered projectile angle, pull speed or cooldown reduction into another patch without retesting. Here, the browser can still help you prepare WEE and WWW; it cannot display the upgrade's battlefield effect.
Categorizing the 10 spells by tactical purpose
Grouping the ten recipes by purpose can help you decide which one to prepare. These are planning cues, not a claim that the browser simulates their full battlefield effects:
1. Crowd control and initiation
- Cold Snap: Think about repeated hits after the initial disable; in Demo, test how your current spell level and follow-up attacks affect control.
- Tornado: Use a lifted target to prepare the next action. Check current dispel and lift behavior in the client before building a timing plan around it.
- Ice Wall: Plan where the wall will appear relative to Invoker and the enemy's route. Test placement and slow behavior against a moving target.
2. High-impact burst damage
- Sun Strike: Prepare
EEEfor a ground target; check the current delay and how multiple units affect damage in Demo before promising a kill. - Chaos Meteor: Prepare
WEEand plan the travel direction. A moving enemy can leave the path even when the recipe is entered correctly. - Deafening Blast: Prepare one orb of each kind, then test current knockback, disarm and any upgrade in the client. Its control effect is a separate question from the queue recipe.
3. Utility, buffs and resource denial
- E.M.P.: Plan around the detonation location and the enemy's mana, but read the current delay and effect in the client. In Combo, its
WWWrecipe is the measurable part. - Ghost Walk: Prepare
QQWas an escape option, then verify current detection, slow and movement behavior in Demo. An invoked spell is not proof of a safe escape. - Alacrity: Prepare
WWEfor an attack-focused ally or controlled unit when allowed by current targeting rules; check the buff in the client. - Forge Spirit: Prepare
QEE, then separately train unit selection and commands in Dota. This browser has no spirit-control simulation.
Common recipe confusion pairs and diagnostic drills
Beginner and intermediate players frequently misfire because several essential spells share overlapping elemental components:
Confusion Pair 1: Tornado (QWW) versus Ice Wall (QQE)
Under sudden initiation pressure, players often mix up the required Quas count:
- Tornado (
QWW): Requires two parts storm and one part ice. It is an offensive ranged projectile. - Ice Wall (
QQE): Requires two parts ice and one part fire. It is an immediate defensive barrier. - Diagnostic Drill: Switch between
QWW RandQQE Rrepeatedly in practice. Note that converting from Tornado to Ice Wall requires pressingQ Q E Rto flush the two older Wex orbs.
Confusion Pair 2: Chaos Meteor (WEE) versus Deafening Blast (QWE)
When attempting to execute a rapid Meteor-Blast follow-up:
- Chaos Meteor (
WEE): Two parts fire, one part storm. - Deafening Blast (
QWE): Balanced triad of all three elements. - Diagnostic Drill: If your queue is
EEW,Q RproducesEWQand invokes Deafening Blast. FromWEE, however, one Q producesEEQ(Forge Spirit); useQ W Rto reachEQWand invoke Blast. Both starting arrangements invoke Meteor, but the oldest orb differs. Read the actual queue before choosing a shortcut; this exercise measures input economy, not projectile landing timing.
Confusion Pair 3: Ghost Walk (QQW) versus Cold Snap (QQQ)
When getting jumped by enemy gankers in the river or jungle:
- Panic Symptom: Panicked players mash
Qrepeatedly and invoke Cold Snap instead of Ghost Walk, leaving themselves visible and vulnerable. - Mental Cue: Train your left ring finger to tap
Wimmediately after twoQpresses:Q Q W R.
Structured 4-stage practice routine on InvokerGame
Memorizing a static reference chart is only the first step. True competitive execution demands subconscious muscle memory. Use this progressive curriculum:
Stage 1: Tutorial Mode reflex benchmark
- Launch Tutorial Mode.
- The trainer displays the ten spells in a fixed teaching order, clearing the queue after each correct Invoke. Start each recipe deliberately and use the visible hint to identify the element you missed.
- Target Benchmark: Finish the lesson twice without a wrong recipe. Tutorial does not provide a scored reaction-time benchmark; use the timed Race mode when you are ready to compare completion times.
Stage 2: Race Mode queue preservation
- Enter Race Mode with tips disabled.
- Focus on calculating orb reuse: whenever a new target shares elements with your current queue, input only the minimal replacement orbs rather than resetting the entire combination.
- Target Benchmark: Achieve a 10-spell clear time of a consistent personal baseline over several clean runs with the same hint and pause settings. The random spell order affects the input path, so one unusually fast result is not a complete comparison.
Stage 3: Combat Mode slot discipline
- Switch to Combat Mode.
- Train your eyes to audit Slot D and Slot F before touching your keyboard. If the required spell is already in a slot, cast it immediately without pressing Invoke.
- Target Benchmark: First record a clean personal baseline. Repeat with fewer redundant invokes and wrong-slot presses before chasing a particular efficiency percentage; generated starting states make a single score a poor layout comparison.
Stage 4: Daily Challenge leaderboard benchmarking
- Compete in the Daily Combat Challenge.
- Everyone receives the same date-specific scenario. Read its actual initial state, compare efficiency and recorded errors, and use completion time as a later ranking factor. The scenario is generated for the date; it is not a replay imported from a professional match.
Related reading
Keybinds and mechanics
Invoker Hotkeys: Legacy, QWER and Quickcast Practice Guide
Choose a comfortable Invoker layout, compare cast confirmation methods, avoid item and unit-control conflicts, and test six trainer bindings with a repeatable practice routine.
Combos and execution
Invoker Eul Combo: Timing, Slot Preparation and Practice
Learn how to prepare Sun Strike, Chaos Meteor and Deafening Blast, calculate landing windows, diagnose missed casts, and separate browser drills from Dota 2 Demo practice.