
Invoker Combo Mastery: Keystroke Economy, Scoring Math & Real-Match Boundaries
Master optimal orb reuse paths, dissect the exact formulas behind Combo and Combat efficiency scores, and train with structured drills while understanding match timing limits.
Updated
On this page
- One combination, two input paths: keystroke economy
- Why Path A is mathematically optimal
- Multi-spell chains: Tornado → Chaos Meteor → Deafening Blast
- Demystifying scoring: Combo mode vs Combat mode
- Concrete scoring calculations
- D/F slot decision tree in Combat mode
- The risk of preloading
- Site-exclusive combo training protocol
- Step 1: Isolation drilling in Combo mode
- Step 2: Strict Mode stress testing
- Step 3: Standard 16-spell benchmark
- Step 4: Scenario transfer in Daily Combat
- Real-match applicability boundaries: timing limits & physics
- 1. Scaling lift times vs fixed delays
- 2. Physical projectile drop and rolling delays
- 3. Cast point and turn rates
- 4. Cooldown constraints and mana budgeting
- 5. Enemy defensive items and dispels
Invoker Game isolates the three core technical pillars of playing Invoker: recipe recall, keystroke economy, and slot decision-making.
This guide breaks down the mathematics behind our scoring models, contrasts optimal input paths with wasteful ones, and outlines a structured training regimen while establishing the exact boundaries where browser training ends and real Dota 2 physics begin.
One combination, two input paths: keystroke economy
Consider invoking Tornado ( Tornado) followed immediately by E.M.P. (
 E.M.P.), starting with an empty queue:
| Input path | Keystrokes | Orb presses | Invoke presses | Total actions |
|---|---|---|---|---|
| Path A (Preserve Wex) | QWW R → W R | 4 | 2 | 6 |
| Path B (Rebuild from scratch) | WWQ R → WWW R | 6 | 2 | 8 |
Why Path A is mathematically optimal
Starting from an empty queue, your first spell requires three orbs. Because Tornado (WWQ) and E.M.P. (WWW) share two Wex orbs, the theoretical lower bound for the second spell is one additional orb. Entering QWW allows a single W to eject the leading Q, instantly completing WWW. Path A achieves this lower bound (4 orbs + 2 Invokes = 6 actions).
Conversely, typing WWQ traps Q in the middle when you press W (WQW), forcing you to flush the queue with three fresh W presses. Path B wastes 2 full orb presses—a 33% increase in finger travel.
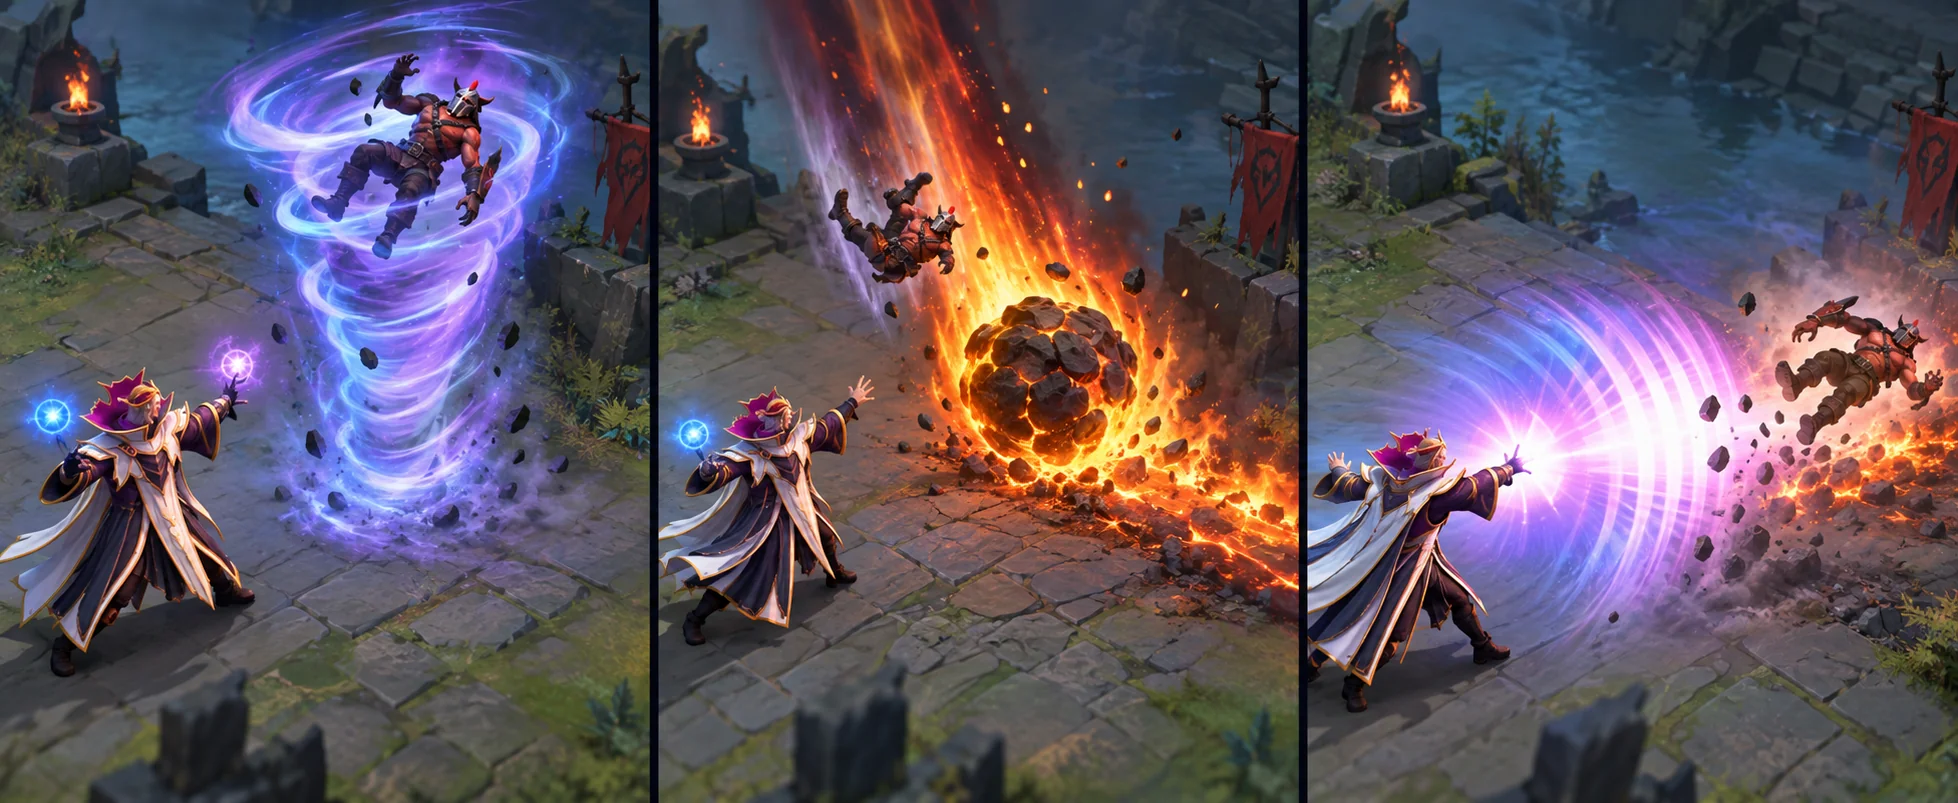
Multi-spell chains: Tornado → Chaos Meteor → Deafening Blast
The power of queue retention multiplies across longer chains:
- Tornado: Input
QWW R(3 orbs + 1 Invoke). Active queue:QWW. - Chaos Meteor (
EEW): InputEE R. Adding two Exorts shifts the queue:QWW → WWE → WEE. Chaos Meteor is ready in 2 orb presses. Active queue:WEE. - Deafening Blast (
QWE): InputQW R. AddingQthenWshifts the queue:WEE → EEQ → EQW. Deafening Blast is ready in 2 orb presses.
Total orbs across all three spells: 3 + 2 + 2 = 7 orb presses (plus 3 Invokes = 10 total actions). Rebuilding each spell independently (QWW R → EEW R → QWE R) requires 9 orb presses (12 total actions).
Demystifying scoring: Combo mode vs Combat mode
Our trainer features two distinct scoring engines tailored for different skills. They must not be conflated:
| Feature / Metric | Combo Mode (Combo) | Combat Mode (Combat) |
|---|---|---|
| Primary focus | Keystroke economy & combo execution | Dynamic slot decisions & continuous battle reaction |
| Target workload | 16 spells across 4–6 randomized combo rounds | 16 targets in a continuous, uninterrupted scenario |
| Queue lifecycle | Cleared between combinations; persists within each combo | Persists continuously across all 16 targets |
| Efficiency formula | (Par Orb Presses / Actual Orb Presses) * 100% | (Par Total Inputs / Actual Total Inputs) * 100% |
| Numerator | Minimum orb presses (Standard run = 36 orbs) | Minimum total inputs calculated by scenario solver |
| Denominator | Orb presses only (Invoke 'R' is excluded) | All inputs (Q, W, E, R, D, and F are all counted) |
| Mistakes tracked | wrongInvokes (Wrong recipe invoked) | wrongSlotPresses + redundantInvokes |
| Strict mode effect | Resets current combo and clears queue | Not applicable (continuous run) |
Concrete scoring calculations
Combo mode example
- A standard random run has a fixed par of 36 orb presses and 16 spells.
- Suppose you complete the run using 45 orb presses, 16 Invokes, and commit 1 wrong invoke.
- Combo Efficiency:
36 / 45 = 80.0%. - Notice that Invoke presses (R) are not part of the denominator. However, extra or wasted orb presses directly penalize efficiency.
- Strict Mode Penalty: If Strict Mode is active, an incorrect invoke resets the current combination back to its first spell and wipes the queue. All wasted orb presses and elapsed time remain in your final tally, drastically lowering your efficiency and leaderboard standing.
Combat mode example
- The scenario solver calculates an exact minimum of 42 total inputs (par).
- Suppose you finish the 16 targets with:
- 26 orb presses
- 14 Invokes (including 2 redundant invokes where the spell was already in D or F)
- 17 slot casts (including 1 wrong-slot press)
- Total actual inputs:
26 + 14 + 17 = 57. - Combat Efficiency:
min(100%, round(42 / 57 * 100%)) = 74%. - Recorded Mistakes: 2 redundant invokes + 1 wrong slot = 3 errors.
D/F slot decision tree in Combat mode
Combat mode tests your ability to read your active ability slots under pressure. Consider this common scenario:
- Current State: D = Tornado, F = E.M.P., Queue =
QQQ. - Active Targets: First Tornado, then
 Cold Snap.
You have two potential execution paths:
- Path 1 (Direct Cast): Press
D (Cast Tornado) → R (Invoke Cold Snap) → D (Cast Cold Snap). Total: 3 inputs. - Path 2 (Preload): Press
R (Invoke Cold Snap) → F (Cast Tornado) → D (Cast Cold Snap). Total: 3 inputs.
The risk of preloading
Both paths consume exactly three inputs. Preloading does not save a single keystroke. However, preloading shifts Tornado from D into F. If your muscle memory automatically hits D for Tornado, you will cast Cold Snap prematurely, incurring a wrong-slot penalty.
Furthermore, if the required spell were E.M.P., pressing R would permanently evict E.M.P. from F into the void, forcing you to re-invoke it from scratch.
Site-exclusive combo training protocol
Follow this structured protocol to systematically build speed and accuracy:
Step 1: Isolation drilling in Combo mode
- Open Combo mode and use custom selection to isolate 1 or 2 high-frequency pairings:
- Tornado + E.M.P. (
QWW R → W R) - Chaos Meteor + Deafening Blast (
EEW R → Q RfromEEWbase)
- Tornado + E.M.P. (
- Drill these pairs until you consistently hit 100% efficiency.
Step 2: Strict Mode stress testing
- Enable Strict Mode in Combo settings.
- In Strict Mode, any wrong invoke restarts the entire combination from scratch. This forces you to eliminate panic mashing and prioritize clean execution over reckless speed.
- Goal: Complete 5 consecutive runs with 0 resets.
Step 3: Standard 16-spell benchmark
- Switch to the standard random Combo run (16 spells, par 36).
- A mathematically perfect run requires 52 total actions (36 orb presses + 16 Invokes).
- Target benchmark: Complete the run in under 15 seconds with ≥85% efficiency.
Step 4: Scenario transfer in Daily Combat
- Move to Daily Combat.
- Apply your queue retention habits while dynamically managing D/F slot evictions. Compete on the daily leaderboard where ties are broken by:
Efficiency > Zero Wrong Slots > Zero Redundant Invokes > Fastest Time.
Real-match applicability boundaries: timing limits & physics
Invoker Game is designed to train cognitive and physical keystroke fluency. It is vital to recognize what browser trainers cannot replicate about Dota 2 matches:
1. Scaling lift times vs fixed delays
In Dota 2, Tornado's lift duration scales continuously with your Quas level (from roughly 1.2 seconds up to 2.9 seconds depending on balance patches). A fixed millisecond delay that lands a perfect Sun Strike or Meteor at Quas level 2 will completely miss at Quas level 5. You must dynamically adjust your release timing based on your hero's current skill levels.
2. Physical projectile drop and rolling delays
Chaos Meteor requires 1.3 seconds from cast completion to ground impact, after which it rolls forward over several seconds dealing contact damage per tick. Landing full Meteor damage requires locking the enemy in place (via Cold Snap, Deafening Blast, or teammate stuns) or dropping it along their inevitable retreat path.
3. Cast point and turn rates
Invoker possesses a 0.05-second cast point on spells. Furthermore, if your hero is facing away from the target, your hero must turn before initiating the cast animation. At high levels, turn rate latency can disrupt tightly timed combos.
4. Cooldown constraints and mana budgeting
In Combat mode, identical spells can appear back-to-back. In real matches, Invoke has a cooldown, and major spells (Chaos Meteor, E.M.P., Deafening Blast) have cooldowns ranging from 20 to 55 seconds. Additionally, executing a full 4-spell rotation demands 600–1000+ mana, requiring items like Eul's Scepter, Arcane Boots, or Octarine Core.
5. Enemy defensive items and dispels
Real opponents do not stand idle. Black King Bar provides magic immunity, Lotus Orb reflects target spells, Eul's Scepter provides self-banishment, and Force Staff pushes allies out of Meteor rolling paths.
Summary: Use Invoker Game to make spell formulation and slot management second nature. Once your keystrokes are automatic, enter the Dota 2 Hero Demo to practice visual timing cues, projectile speeds, and range management under the current patch.
Related reading
Practice and mechanics
Top 7 Beginner Invoker Mistakes in Dota 2 and How to Avoid Them
Avoid the top beginner mistakes Invoker players make in Dota 2: redundant invokes, mana pool traps, friendly CC cancellation, and panic mashing.
Practice and mechanics
Invoker Orb Queues, D/F Slot Dynamics & Structured Practice Guide
Master the 3-orb FIFO queue, predict slot transitions, run hands-on queue experiments, and follow our site-exclusive training progression without false patch promises.